
How To Secure Your WordPress Site
If you run your own website you will know just how important it is to know that it is safe and secure. I think it is safe to say that most website owners and bloggers fear being hacked and potentially losing everything that they have worked to build up.
Thankfully, there are many security measures that you can incorporate into your site to make things a lot more secure. Many people choose to install some sort of security WordPress plugin, and whilst they can be beneficial, making some simple backend changes can make a big difference. In this post I want to talk about one of those methods that you can setup yourself.
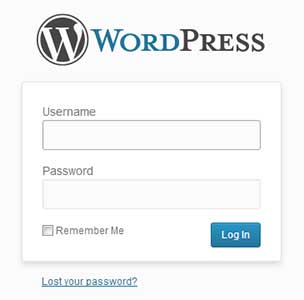
WordPress Dashboard Login
Anyone that runs a WordPress site will be familiar with the WordPress dashboard login screen.
This is the gateway to your website/blog that allows you access to edit and upload new content for your readers.
Regardless of the amount of security features you install on your website, a hacker is only a username and password from gaining access to your entire site. That is bad!!!
It should go without saying, but you should NEVER, EVER give out your login details to anyone.
If, for some reason, you need to give someone access to your website (i.e. web designer, staff writers, etc.) then create a separate login account for them. That way, you still have your own access to your site should something happen.
Important: Always, always, always make sure that you change your default WordPress login details from “admin” to something else and pick a loooooonnnng password that contains both letters (UPPER & lower case), numbers and symbols (£, &, ?, /, ”, =, %, $, etc.). It’s also useful to change your password regularly.
Even when you have picked the most secure username and password, you are still vulnerable to hackers gaining entry to your site. They do this with a brute force attack, which is when they use software to try every possible combination to guess your username and password.
Now, if you have a complicated one (say 15+ characters, upper, lower, numbers, symbols, etc.) then that can take a while.
What is even better though is to add another level of protection, which essentially doubles your security.
Creating An Additional Security Level
You may be thinking that this is going to be incredibly hard to setup, but before I begin, I just want to reassure you that this is actually pretty quick and easy to do – I’d say it will take 5 minutes at the most. If I can do it, you definitely can, so there is no excuse to put it off for another day.
To begin with, you will need to login to your cPanel (hosting account).
Now, I use both learn how to blog hosting and HostGator for my sites. For the purpose of this post I will be using screenshots from Hostgator, but if you use another hosting provider you will find most (if not all) of the steps to be exactly the same.
So, login to your cPanel and navigate down to the ‘Security’ tab. You will want to click on the ‘Password Protect Directories’ folder.
1. cPanel > Security > Password Protect Directories
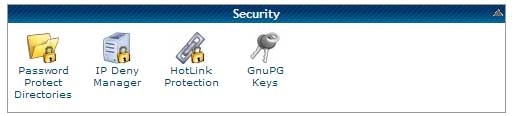
It will then ask you to select the folder that you wish to protect. You want to select the folder that your WordPress files are stored on, which is the ‘wp-admin’ folder unless you moved or renamed it when installing WordPress for the first time.
2. Select ‘wp-admin’ folder
![]()
Next up, you can set up your security settings and create a username and password.
Make sure that you check the ‘Password protect this directory’ box and name it. Then simply create a new user with a STRONG password. Obviously, make sure this is different to your normal WordPress dashboard login details otherwise there is no point.
3. Check the ‘Password protect this directory’ box and name it.
4. Create a new user with a strong password.

That is it, as simple as that!
Now whenever you go to log into your WordPress dashboard, you will see a new authentication box where you enter in your newly created username and password. This will then lead to your normal WordPress Dashboard login screen.
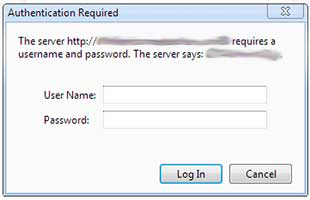
You now have a two tiered security setup that will help prevent anyone from gaining access to your site.
Just remember to change your passwords regularly and never give them out to anyone.
Your Turn:
If you would like more in-depth information and coaching to learn how to blog successfully then sign up for our 12 module coaching program.
Are you using any kind of security measures on your blog?
Are you using a plugin or have you chosen to use the backend changes? I’m interested to hear your thoughts so please share below.
Related Posts :


Written by Catherine Holt
Catherine Holt is the founder of Blogging Tips 101. She has been an internet marketer since 2012. Connect with her on Twitter, Facebook, Google and Pinterest.
I would also suggest keeping your cms and plugins updated.
If your site still has timthumb or is still using a pretty outdated theme, change it now.
iThemes is my fav security plugin. It makes things really easy! Plus it suggests stuff to you!
All those combined wont really stop a determined hacker. A really good hacker that is. The good ones can just bust through your server.
But for the majority of automated wannabes out there, then Catherine’s tips above can minimize the chances of them dropping files or editing anything on your server/WP backend.
Remember to backup regularly as well!
Hi Catherine,
Always learning new stuff on the WP backend, as it’s out of my wheel house
Thanks so much for sharing….tweeting through Triberr.
Ryan
This is awesome, thank you so much for sharing. You can never have too many safety precautions.
Catherine,
I signed up for SiteLock but as it turned out they were totally lying to me about all kinds of stuff, trying to scam me out of hundreds of dollars telling me I had malware that I actually didn’t have.
Just wanted to put that out there for people who are clueless about site security and looking to keep it safe– I don’t know what is, but I do know SiteLock is NOT the answer!
Brittany